

Table of Contents
ToggleA stainless steel deck railing transforms a basic structure into a polished, long-lasting safety feature that complements any home exterior. Unlike wood or traditional metal options, stainless steel resists rust, requires minimal upkeep, and delivers a sleek contemporary look that doesn’t fade or deteriorate under sun, rain, or snow. Whether you’re building a new deck or upgrading an aging railing system, understanding your options, from cable assemblies to balusters, helps you choose the right system for your climate, budget, and aesthetic. This guide walks you through what makes stainless steel the smart choice, how to pick the right type, installation basics, and long-term maintenance so your railing stays beautiful and code-compliant for decades.
Key Takeaways
- Stainless steel deck railing resists rust and corrosion for 20+ years without repainting, making it ideal for coastal and snowy climates where wood and painted steel fail.
- Grade 304 stainless steel is the industry standard for residential railings, while Grade 316 offers superior salt-spray resistance in marine environments.
- Cable, baluster, and glass-hybrid systems each offer distinct benefits: cable ($150–$300/linear foot) provides modern aesthetics with clear views, balusters ($80–$250/linear foot) offer classic appeal and easier DIY installation, and glass hybrids ($250–$400+/linear foot) deliver ultra-modern design.
- Deck railing installations must meet International Residential Code requirements including a 42-inch minimum height and 4-inch sphere spacing to prevent child entrapment; always confirm local codes and obtain permits.
- Monthly cleaning with soapy water, quarterly vinegar treatments, and annual deep cleans using stainless steel-specific cleaners keep your railing looking pristine while protecting against mineral deposits and corrosion.
- Use only stainless steel fasteners when installing a stainless steel deck railing; galvanized bolts and fasteners corrode in contact with stainless and undermine the system’s durability.
Why Stainless Steel Is The Best Choice For Deck Railings
Durability And Weather Resistance
Stainless steel doesn’t rust or corrode the way carbon steel, aluminum, or untreated wood does. Its iron-chromium alloy composition creates a self-healing oxide layer that protects the metal from salt spray, moisture, and freeze-thaw cycles. Homeowners in coastal or snowy climates see the biggest payoff: a railing that looks pristine after 20+ years while wooden railings splinter and vinyl fades. Grade 304 stainless steel is the industry standard for residential railings: it handles most North American weather without special coatings. Grade 316, used in marine environments, costs more but resists chloride corrosion even better.
Unlike painted steel railings, stainless never needs repainting or rust treatment. This cuts maintenance labor to a fraction of what wood requires, no sanding, staining, or replacement boards every 5–10 years.
Aesthetic Appeal And Modern Design
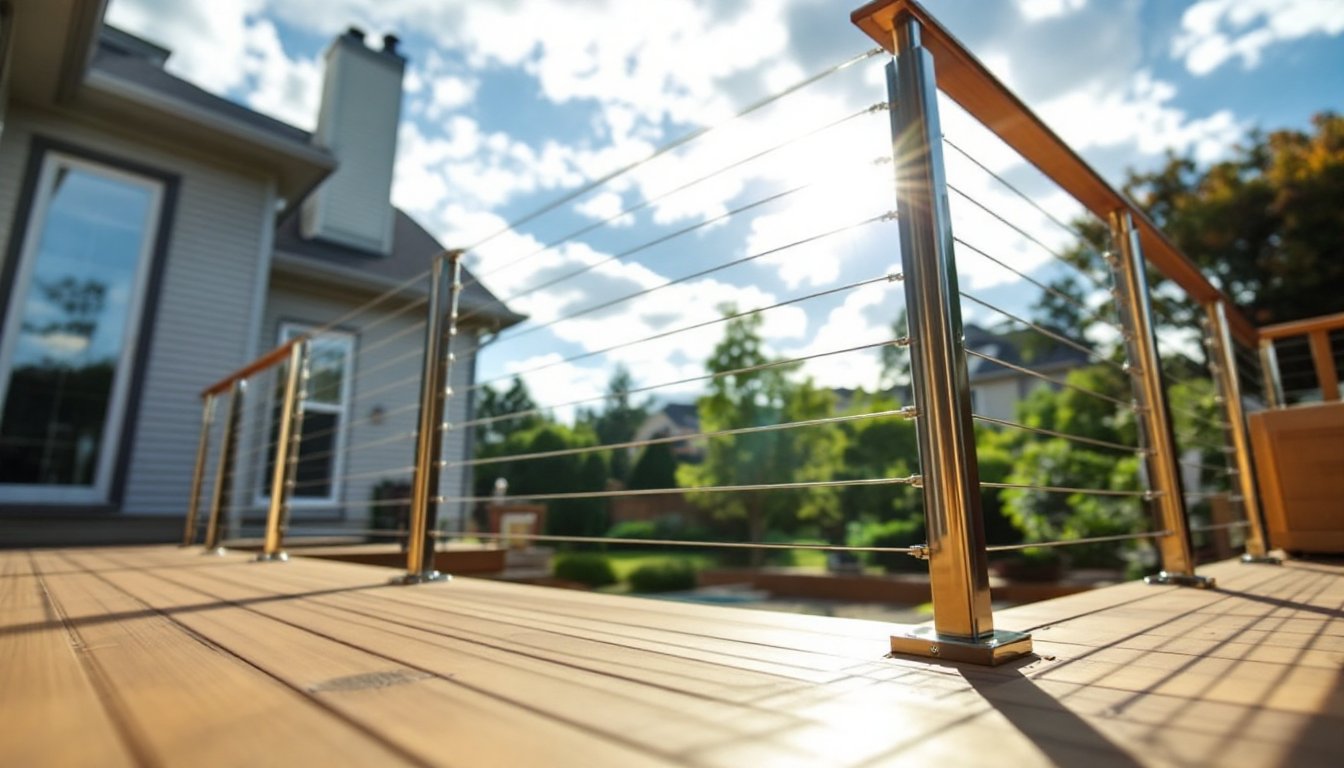
Stainless steel reads as premium and contemporary. Its satin or brushed finish works with traditional, transitional, and modern homes alike. The metal’s clean lines and reflective surface catch light subtly, adding visual interest without screaming “look at me.” Cable railing systems, in particular, create an airy, unobstructed view, ideal for decks overlooking water or landscape views. Balusters (vertical spindles) come in solid rod, hollow tube, or decorative twisted designs, giving you flexibility to match your home’s character.
The sleek appearance also holds resale value. Buyers recognize stainless as a durable, upscale choice that eliminates future railing concerns.
Types Of Stainless Steel Deck Railing Systems
Cable railing uses horizontal 1/8-inch or 3/16-inch stainless cables strung between posts and end terminals. It’s minimalist, offers clear sightlines, and costs $150–$300 per linear foot installed. Codes require cable spacing tight enough that a 4-inch sphere can’t pass through, this prevents child entrapment. Cable requires tensioning tools and patience during installation but rewards you with a contemporary look.
Balusters and rails are the classic approach: vertical stainless rods or tubes anchored to a top and bottom rail. Baluster styles range from simple solid rods (around $80–$150 per linear foot) to decorative twisted or fluted designs ($150–$250 per linear foot). This system is forgiving for DIY installation, you’re essentially bolting components to a frame.
Glass and stainless hybrid systems sandwich tempered glass panels between stainless frames. They’re pricier ($250–$400+ per linear foot) but deliver an ultra-modern, unobstructed view. Installation involves precise spacing and professional sealing, so this isn’t ideal for first-time DIYers.
Costs vary by region, materials sourced, and whether you hire a professional or tackle installation yourself. Home improvement cost estimators help you baseline expectations in your area.
Installation Basics For DIY Homeowners
Preparation And Code Compliance
Before ordering materials, confirm your local building code requirements. The International Residential Code (IRC) mandates that deck railings be at least 42 inches tall measured from the deck surface to the top of the rail. Balusters or cable must be spaced so a 4-inch sphere can’t slip through. Many jurisdictions require permits for deck work: stainless railing installation alone often qualifies, so check with your local building department, fees are modest ($50–$200) and the inspection ensures your safety.
Measure your deck perimeter carefully. Account for corner posts and any height variations in your deck framing. Order materials with a 5–10% overage for cuts and mistakes.
Step-by-Step Installation Overview
For cable railing:
- Mark post locations and install Grade 304 stainless steel posts (typically 4×4 or 2×6 depending on span and load) into the deck frame using through-bolts or lag bolts, ensuring posts are plumb (use a level).
- Drill holes for cable end terminals at the top and bottom rails, maintaining the 4-inch sphere clearance rule.
- Cut cable to length using a cable cutter, a hacksaw crushes the strands.
- Thread cable through turnbuckles and terminals, tensioning evenly so there’s no sag and no excessive tightness that deforms the cable.
- Lock turnbuckles and trim excess cable with a bench grinder, smoothing sharp edges.
For balusters:
- Install top and bottom rails (usually 1.5 × 2-inch stainless tubing or solid rods) between posts, ensuring they’re level and properly spaced.
- Mark baluster spacing, typically 4 inches apart center-to-center.
- Drill mounting holes in both rails and secure balusters with stainless steel fasteners (bolts or set screws, never galvanized fasteners, which corrode in contact with stainless).
- Use thread-locking compound on bolts to prevent vibration loosening.
Safety And Tools
Wear safety glasses when grinding or cutting cable: wear work gloves to protect from sharp cable ends and burrs. A drill-driver with stainless bits, a level, and a tape measure are non-negotiable. For cable systems, you’ll need a cable cutter, turnbuckles, and a small adjustable wrench. Many homeowners rent or borrow these specialized tools rather than buy, renting costs $20–$50 per day and saves money unless you’re building multiple railings.
If your deck has structural concerns, post spacing exceeds 6 feet, or you’re unsure about fastening to your specific deck framing, hire a professional. Railing failure is a safety liability, and railing installation costs justified by a pro’s warranty and insurance often beat DIY mistakes.
Cleaning And Maintenance Best Practices
Stainless steel’s main advantage is low maintenance, but “low” doesn’t mean “none.” Mineral deposits, salt spray residue, and fingerprints will accumulate and eventually etch the surface if ignored.
Monthly cleaning: Use a soft cloth or microfiber towel dampened with warm water and a few drops of dish soap. Wipe along the grain if the finish is satin or brushed (most residential railings are). Dry immediately with a clean towel to prevent water spots. This takes 15 minutes for a typical 30-foot deck.
Quarterly or after salt exposure: Mix equal parts white vinegar and water in a spray bottle. Spray affected areas and wipe with a soft cloth. Vinegar cuts mineral buildup and light corrosion without damaging the stainless layer. Rinse with fresh water and dry.
Annual deep clean: For coastal or heavily salted regions, use a stainless steel cleaner (brands like Barkeeper’s Friend or commercial stainless creams, $8–$15 per can) applied with a non-abrasive sponge. Follow the product instructions carefully, some require rinsing: others don’t. Test on a hidden section first to ensure no discoloration. Avoid chlorine-based cleaners and steel wool, both of which pit the surface.
Inspect fasteners: Once yearly, check that bolts, set screws, and cable turnbuckles are snug. Tighten any loose hardware with an appropriate wrench. If you notice rust staining around fasteners, the fasteners are likely not stainless, replace them immediately with Grade 304 or 316 stainless bolts and nuts.
This minimal routine keeps your railing looking new and extends its life indefinitely. Neglecting it for years allows pitting and discoloration that’s harder (and costly) to reverse.
Conclusion
Stainless steel deck railings deliver durability, aesthetics, and genuine low-maintenance performance that justify the upfront investment. Whether you choose cable systems for a modern look or balusters for a classic approach, following code requirements, using proper fasteners, and committing to simple annual cleaning ensures your railing performs flawlessly. DIY installation is feasible for confident builders comfortable with drilling, measuring, and tensioning, but don’t hesitate to hire a pro if your deck’s framing or your confidence wavers. A properly installed stainless steel railing is a 30-year asset that adds value and safety to your home.